WINDOWS + CHATGPT

Set up, step by step.

From creating your account to your first task on your PC. See each screen, follow the clicks and check the result.

10 steps9 screenshots (2 captured in Polish ChatGPT)Windows guide

Select any screenshot to enlarge it. LocalCommander screenshots use an example account; your computer’s name will differ. ChatGPT may look different depending on its version and language.

STAGE 1 / 4

Start with your account.

STEP 01

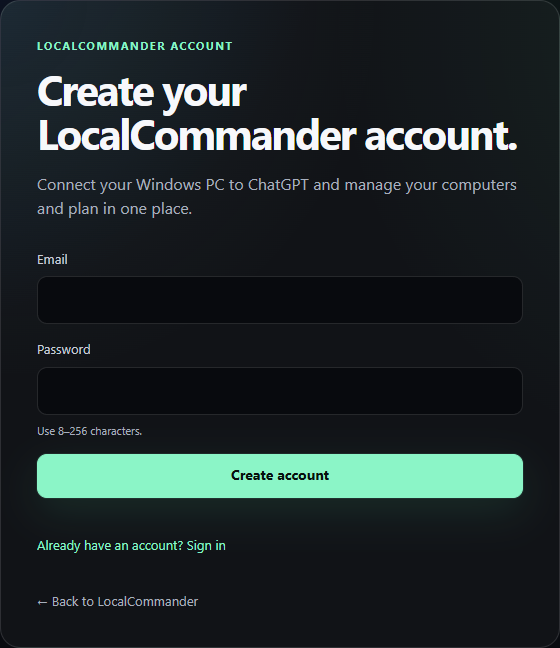
Create your LocalCommander account

  1. Open the form below. Enter your email address and choose a password of at least 8 characters.
  2. Select “Create account”. Use an email address you can access; you will need the verification message next.
  3. Already have an active account? Select “Sign in” and continue with step 3.
After this step

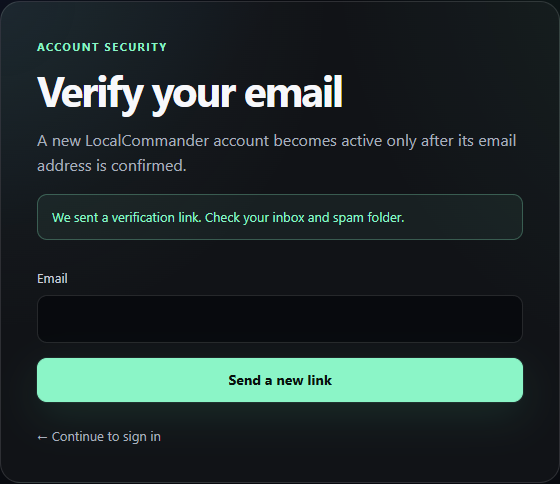
The “Verify your email” page appears.

Open account registration (new tab)
The LocalCommander account registration form.Enlarge screenshot
The LocalCommander account registration form.
STEP 02

Verify your email address

  1. Open the inbox for the address you used to register and find the message from LocalCommander.
  2. Follow the verification link in that message. After verification, select the link to sign in.
  3. Sign in with the same email address and password.
After this step

Your account is active. You can open the download page in step 3.

The email is missing or the link has expired

Check Spam and confirm that the email address is correct. Enter your address on the verification page and request a new link. Open the newest message. Sending the link alone does not verify your account.

This screen confirms that the verification link has been sent.Enlarge screenshot
This screen confirms that the verification link has been sent.

STAGE 2 / 4

Connect your computer.

STEP 03

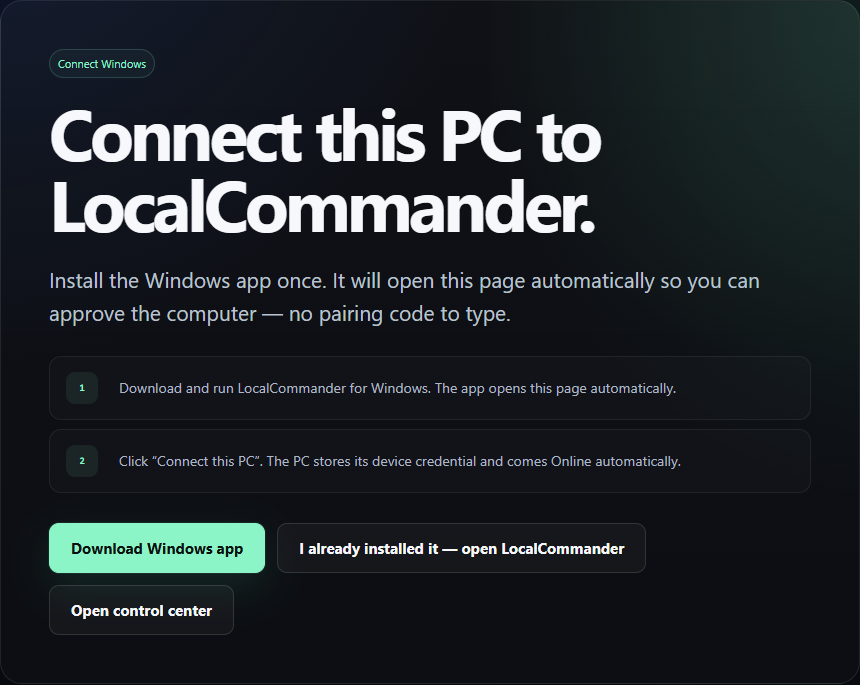
Download the Windows app

  1. On the PC you want to control, open the Windows connection page.
  2. Select “Download Windows app” and wait for the download to finish.
  3. Open LocalCommanderSetup.exe from your browser’s downloads or the Downloads folder.
After this step

The installer window shown in step 4 opens.

Open Windows download (new tab)
LocalCommander is already installed

Select the option to open your existing LocalCommander app and allow your browser to launch it. Then continue with PC approval or check its Online status.

The green button downloads the Windows installer.Enlarge screenshot
The green button downloads the Windows installer.
STEP 04

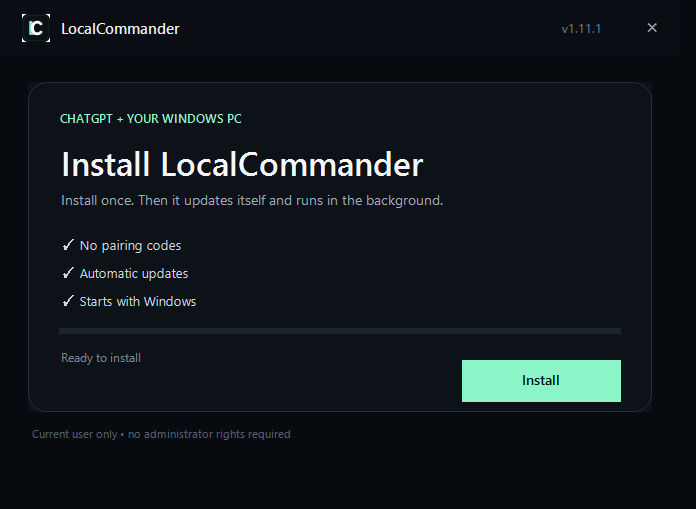
Select “Install”

  1. In the LocalCommander window, select the green “Install” button.
  2. Wait for installation to finish. The app installs for your current Windows user.
  3. LocalCommander starts and opens the PC connection page in your browser.
After this step

Your browser shows the computer’s name and a “Connect this PC” button.

The browser did not open after installation

Start LocalCommander from the Windows Start menu. You can also return to the download page and choose the option to open the existing app. If this PC is already connected, check it in the control center.

The actual LocalCommander Windows installer window.Enlarge screenshot
The actual LocalCommander Windows installer window.
STEP 05

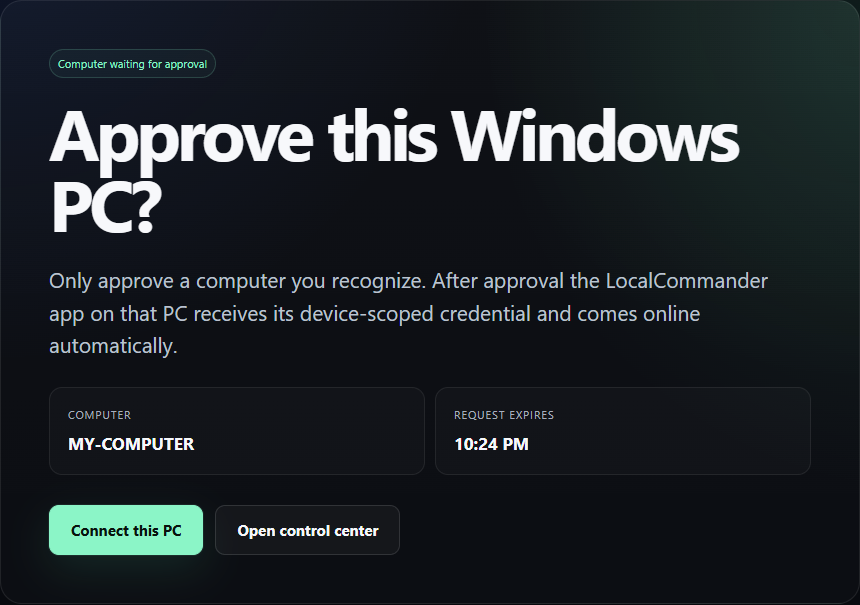
Approve your computer’s connection

  1. If a sign-in page appears, use the LocalCommander account from step 1.
  2. Check the computer name. MY-COMPUTER is an example; your own PC’s name will appear here.
  3. If you recognize the PC, select “Connect this PC” and wait for confirmation.
After this step

The page confirms the connection. This computer is now linked to your account.

The connection request has expired

Open LocalCommander again to get a new approval page. Use the newly opened page instead of an old browser tab.

“Connect this PC” approves the device shown on this screen.Enlarge screenshot
“Connect this PC” approves the device shown on this screen.
STEP 06

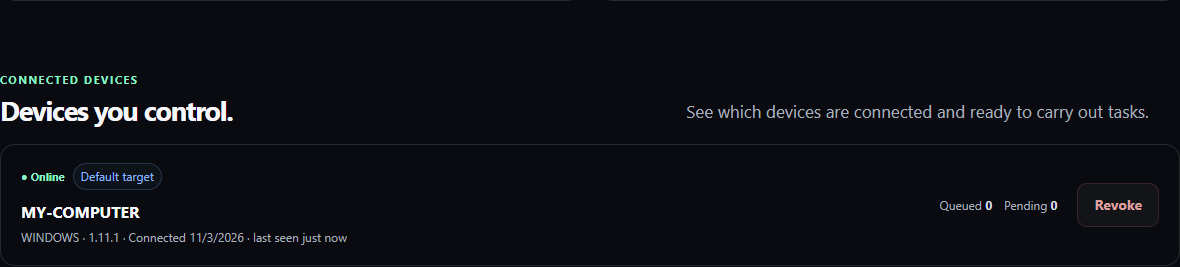
Check that your PC is Online

  1. Open the control center and find the connected devices section.
  2. Look for the green “Online” status next to your computer’s name.
  3. Keep the PC powered on, connected to the internet and running LocalCommander.
After this step

Online means your PC is connected. You can now add the ChatGPT plugin.

Check my devices (new tab)
My PC is missing or Offline

Check that you are using the account that approved this PC. Start LocalCommander on the computer, check its internet connection and refresh the control center. A sleeping or powered-off PC cannot carry out a task.

An example computer successfully connected to the account.Enlarge screenshot
An example computer successfully connected to the account.

STAGE 3 / 4

Add LocalCommander in ChatGPT.

STEP 07

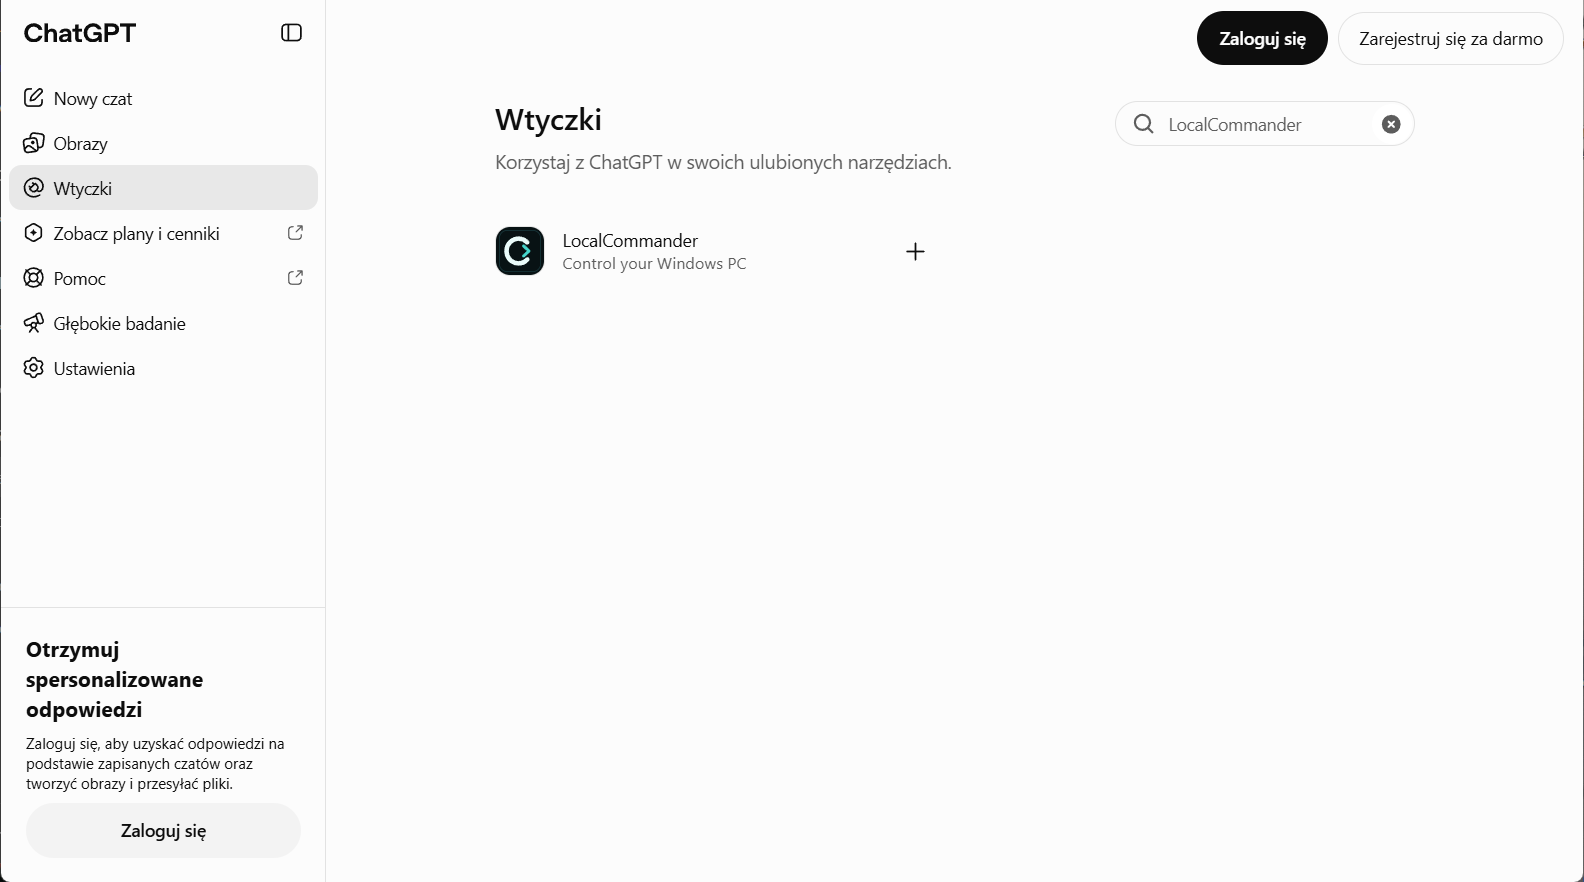
Find LocalCommander in ChatGPT

  1. Open the ChatGPT plugin directory using the button below.
  2. Search for “LocalCommander”. Open the result named LocalCommander with the description “Control your Windows PC”.
  3. You can also open the direct plugin listing in step 8.
After this step

The LocalCommander listing appears with an install button.

Find LocalCommander in ChatGPT (new tab)
Real ChatGPT plugin directory screenshot captured in Polish. The interface language can differ, but the LocalCommander name and publisher identify the listing.Enlarge screenshot
Real ChatGPT plugin directory screenshot captured in Polish. The interface language can differ, but the LocalCommander name and publisher identify the listing.
STEP 08

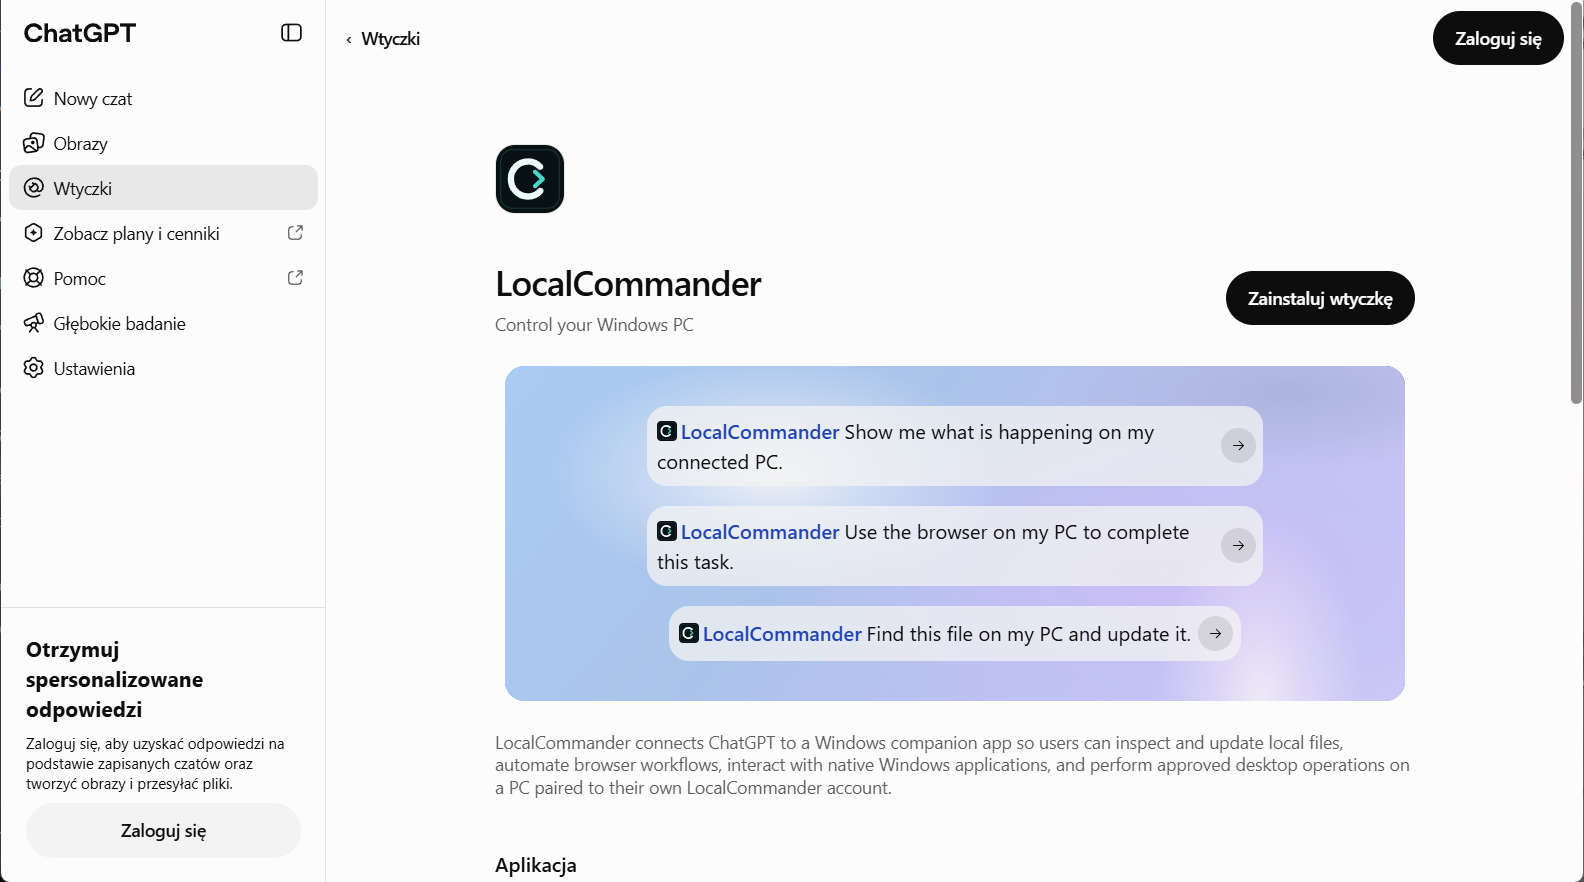
Install the ChatGPT plugin

  1. On the LocalCommander listing, select the install button. The publisher is Solidcodeapps.pl.
  2. If prompted, sign in to your ChatGPT account and return to plugin installation.
  3. Follow the connection steps shown by ChatGPT to connect your LocalCommander account.
After this step

LocalCommander’s sign-in page or the approval screen in step 9 opens.

Open the LocalCommander listing (new tab)
The plugin is already installed

Check that it is connected to the right LocalCommander account, then continue to your first task. Button labels and plugin availability may vary with your ChatGPT version and account settings.

Real LocalCommander listing captured in the Polish ChatGPT interface. Look for the Solidcodeapps.pl publisher; the install button may use different wording.Enlarge screenshot
Real LocalCommander listing captured in the Polish ChatGPT interface. Look for the Solidcodeapps.pl publisher; the install button may use different wording.
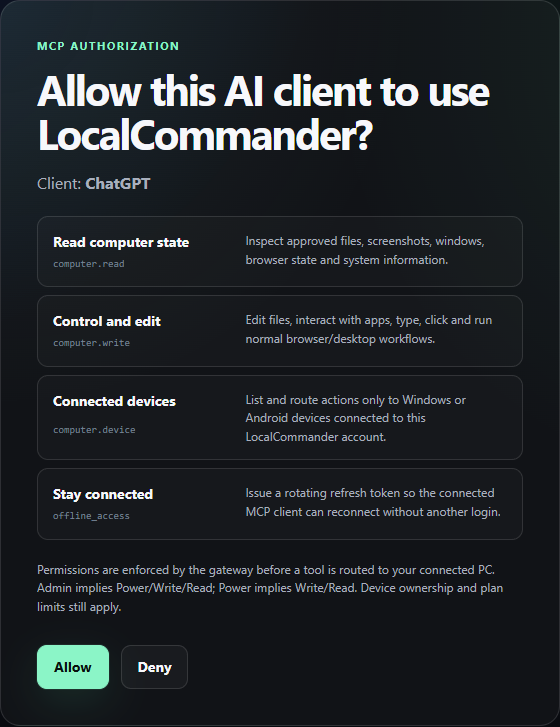
STEP 09

Connect the same LocalCommander account

  1. If asked to sign in, use the email and password from step 1: the account where your PC is listed.
  2. On the approval screen, check the ChatGPT client name and read the requested permissions.
  3. If you accept the access shown, select “Allow”. For a wider scope, the button may say “Allow requested access”. Return to ChatGPT.
After this step

ChatGPT confirms the connection. You can select LocalCommander in a conversation.

ChatGPT cannot find my PC

First check the PC’s Online status in the control center. Then check that the plugin uses the same LocalCommander account. A different account will not have access to a computer linked to the first one.

LocalCommander’s approval screen. These permissions are an example; read the list shown to you.Enlarge screenshot
LocalCommander’s approval screen. These permissions are an example; read the list shown to you.

STAGE 4 / 4

Complete your first real task.

STEP 10

Open a new chat, select LocalCommander and run a safe read-only task

  1. Return to ChatGPT and start a new conversation.
  2. Type @LocalCommander and select the plugin from the list. Make sure LocalCommander is added to the conversation.
  3. Copy the prompt, paste it into the conversation and send it. The prompt only reads a file list — it does not delete or change anything.
You are ready when…

ChatGPT returns a list of the newest files in Downloads with dates and sizes. That is your first confirmed result from work performed on your PC.

Your first message to ChatGPT

On my Windows PC, check the Downloads folder. Show the 5 newest files with name, type, modified date and size. Do not change, move or delete anything.

This is a read-only task. If Downloads is empty, ask for a file list from your Desktop instead.

READY TO GO

Now delegate something from your own work.

Choose a ready-to-use example or describe what you need done on your computer.